Thursday, January 12, 2012
Tutorial - Embossed Beeswax and Perfect Pearls Bloom
Here's something a little different for those of you looking to experiment with some Mixed Media but don't want to stray too far away from traditional scrapbook techniques.
I'm a huge fan of Donna Salazar's paper flowers and I especially love the Rose Creations Spellbinders set. For this tutorial I decided to put Donna's Crafty Chronicals to the test and add a mixed media spin on what is already a well known paper flower using some beeswax and Perfect Pearls.
Supplies required
Donna Salazar Rose Creations Spellbinders set
Donna Salazar Crafty Chronicals
Distress ink
Beeswax
Perfect Pearls
Dusting brush
Craft iron
Embossing Folder
Embossing machine (I used my Cuttlebug)
Small plastic sandwhich bag
Brad to use as a flower centre
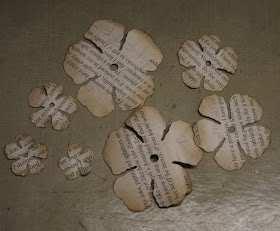
Step One: Using the Rose Creation Spellbinders set, cut two of the large petals and then one of each of the remaining size petals giving you seven petals in total from your Crafty Chronicals. I selected pieces that had text only but there are so many interesting background possibilities to choose from including maps. You can also cut two of the large leaves (not shown on picture). Ink the edges of each of the petals with some vintage photo distress ink.
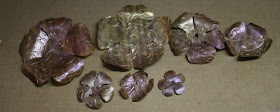
Step Two: Working on your craft mat sprinkle some of the beeswax pellets over your paper petals. Using a craft iron gently iron over the beeswax until it begins to melt. Spread the heated wax over the entire surface area of all the petals making sure that no puddles form.
Step Three: Once the beeswax has cooled, which will only take a few seconds, carefully peel the petals from your craft mat. Cut away any of the excess bits of wax from each of your petals.
Step Four: After several failed attempts at trying to find a method to sucessfully emboss beeswax, I discovered that a plastic sandwhich bag is your best bet. The plastic is thicker than saran wrap so it peels away from the beeswax a lot easier. Do not use wax paper, a lesson I leant the hard way. Place your petals and leaves into the bag so that they lie without overlapping each other. Place the bag into an embossing folder and tuck away the excess plastic so that it does not get tangled in your embossing machine.
Step Five: Run it through your embossing machine. Notice how the plastic sticks to the beeswax. It's for this reason that you don't want to use wax paper. It is literally impossible to peel away the wax paper. Saran wrap is very thin and can be tricky to remove whereas the sandwhich bag plastic peeled away very easily without affecting the embossed images.
Step Six: Add some colour to your flower and leaves by dusting on some Perfect Pearls. The stickyness of the beeswax makes a perfect base for the mica powders. You do not need to spitz water onto the perfect pearls to seal it as the moisture from the wax will hold the colour perfectly. I used a combination of green patina, antique gold and forever violet for my flower and the green patina only for the leaves.
Step Seven: Working from your largest petals to the smallest petals alternate between curling the petals backwards and inwards as shown above. You can use the handle of your dusting brush to do this.
Step Eight: Now stack your flower starting with the largest flower with the petals curled backwards until the smallest flower. The Rose Creation dies already have a hole in the centre of each flower so it's easy to add a pearl brad as a flower centre. Tuck the leaves under the flower and stick down to complete your flower.
Beeswax is really a fun product to work with and colouring it with Perfect Pearls delivers a gorgeous result. The Crafty Chronicals paper held up to this technique perfectly so if you don't already have some then it's woth the investment. Alternatively use a scripted piece of pp made from a thick cardstock.


Oh Wendy I just love your tutorial-I must give it a shot soon!!!
ReplyDeletei can find more about beeswax in that article. that article is good to read. like that article so much. thanks
ReplyDeleteSuper cute..I would love to do this...but must get some materials first..so it may be a while. ;-(. But they are beautiful. Thanks, Wendy!!
ReplyDelete