Showing posts with label Mixed Media play time. Show all posts

Wednesday, June 20, 2012

Mixed Media Canvas/layout

It's been a while since I've been online due to having to deal with some urgent personal issues but I've really missed crafting and interacting with all the fab crafty ladies online so I've made a commitment to get back into the swing of things as soon as possible. I thought I'd get the ball rolling by posting a LO I did a while back but never got around to posting.
It's one of my favourites for several reasons. Firstly, it was one of my first attempts of combining mixed media canvas work techniques with scrapbooking and secondly, I absolutely adore this picture of my DD and teal/turquoise are some of my favourite colours.
To start I first covered the entire canvas with some gesso beceause at that point I wasn't quite sure which direction I was headed so I wanted a good foundation to work on no matter what. I then misted some Pink Paislee mistable pp's with some of the divine Lindy's Stamp Gang starburst sprays. I placed the misted pp in the centre of the canvas so that it could be used as a solid background for my photograph. I then really got my hands dirty and had a blast adding some textured molding paste to the canvas forming a border around the misted pp. I used my finger to create some swirls in the paste along the right border and then used a palett knife to tap the paste to create that really fantastic looking textured finish at the bottom of the canvas. I wanted to try something completely new and unique so I dug out some glass chips I had used for a one of my kids school projects and did a glass mosaic type  finish along the left and top of the canvas. I did this by first adding a thick layer of molding paste to the canvas which I then embedded the glass chips into. I didn't want the traditional smoothed out finish you would normally do with mosaics so I left areas unfilled between the glass chips for a more distresed finish.
Once the paste had dried I coloured between the glass chips using several colours of LSG mists, starburst mixed with gel medium to create a paint and just went to town....!!!! This really was one of the most fun projects I've worked on.


After my background and canvas base was completely coloured and had dried I added my pic and some embellishments. I used the same LSG mists and paints to alter the iamroses flowers as well as this mini tag I made by adding wrinkled tissue paper to a normal mail tag with some gel medium. I then embellished the tag with some gems. I also coloured the lace and white photo corners with the LSG paint. I finished my project off by adding some gorgeous Prima flourishes.
I intend on trying a few more of these type projects in the near future because they're great fun to work on and it's a perfect opportunity to try new things you can't always get away with on paper bases.

Thanks for stopping by.........


Monday, February 6, 2012

CSI #4 - Sweet Slumber

This is my entry for the CSI #4 Challenge. I'm delighted that I finally managed to get a LO done in time before the dreaded deadline, even if it was at 11:30pm my time the day of the deadline...LOL!. It's a great new ning site and I must say that Debbie and her team have put together some interesting challenges.

Above is a summary of what this weeks challenge was. You have to use at least two items from the "Evidence" list. I used a frame and my wet mediums were mists and gesso. I also added several metal pieces as my reflective surface item. "Testimony" is the guideline provided for your page journaling. This alone is a challenge for me because I usually don't add journaling to my LO's. My journaling is a childhood prayer I used to say every night at bedtime.

I am a huge fan of Finnabair's and have been dying to try her misting technique. Unfortunately I have not had the privledge of ever attending one of her classes but I have studied her work and tried to pick up bits and pieces along the way. I have no idea how she puts her LO's together but based on what I THINK she does, I did my own version of her misting technique.
To start I first masked some brick wall detail onto my Prima Mistable canvas base using gesso which I knew would act as a resist when I added the mist later.

I then glued down my photo...what a crazy feeling to glue your photo down first before altering your embellies. I then added some strips of lace here and there which I used as a base for my floral clusters

The great part about this technique is you don't have to colour co-ordinate your flowers because you're going to mist them anyway. It's a perfect opportunity to use up the last of some floral collections gathering dust in your stash. I also added some metal pieces to my clusters. To finish off I placed various sized pearls around each floral cluster.
I wrote my journaling on some cs and framed it with a small metal frame. I then also added some lace and made a mini floral cluster alongside the frame. A helpful tip is to use a hot glue gun when creating clusters so that your items stick instantly and don't move around when adding to it.

Once everything was stuck down I covered my picture and journaling frame with some plastic wrap to protect them from the mist. I then used mists the colours of the colour pallett provided for the challenge and had an ink party for one!!!!! This was so much fun and even though my LO isn't even close to the brilliance of finnabair, I'm delighted with the results for my first attempt and will defintely use this technique again.

Monday, October 17, 2011

Tutorial - Newspaper Letters


Most households worldwide have a pile of newspapers piled up somewhere. These have been put to good use by crafters for a very long time making larger projects like paper mache or simpler altered items. Today I want to downscale even more and show you how to transform a simple item like a chipboard letter into something special to add to your paper crafting project. This was a tutorial featured in the August copy of Scarpbook News and Review magazine

Supplies
Chipboard letters
Newspaper
Ink
Paint
Gel Medium
Step One: Tear a piece of newspaper up into small pieces as shown above. Try and find a piece of newspaper that has text on both sides of the paper.
Step Two: Paste the newspaper onto the chipboard letter. Place the newspaper pieces onto the letter in a random pattern with the text running in various directions.
Step Three: Turn the chipboard letter over and add some adhesive to the sides. Fold the newspaper over the sides and cut away any excess pieces.
Step Four: Turn the Chipboard letter right side up again and lightly sand the edges with a sanding block to smooth them.
Step Five A: You have several options to finish your letters off. The first and easiest option is to ink the edges. You could ink them lightly or heavily as I have done for a more dramatic look.
Step Five B.1: Another option is to first ink the edges and then add some acrylic paint to your letter. In keeping with the recycling theme, use items like toilet paper rolls to stamp onto your letters.
Step Five B.2: For a more distressed painted finish add a layer of Ranger Rock Candy crackle paint.
Step Five C.1: Another option to finish off your letters is to age your letters for a vintage look. Start by inking your newspaper covered letter with some Ranger Vintage photo distress ink. Then ink the edges with some Walnut Stain distress ink.
Step Five C.2: Now add a layer of extra thick gel medium to the entire surface of your letter. For added texture you could tap your finger on the gel to create some peaks. Set aside to dry.
Step Five C.3: Once the gel medium has dried completely you can add some more ink and perhaps some metallic paints to the letter for a really aged finish. The gel medium on the letter above was smoothed over before it dried.
Step Five C.4: For the letter above I created a far more textured surface with the gel medium but tapping it with my finger. This is a really lovely finish and definitely my personal favourite of the options I’ve demonstrated.

Depending on your personal style, there are dozens of options to finish your letters. You could dip your covered letters into some clear UTEE, stamp and emboss over the newspaper text or maybe even mist them. Not only is this a fun technique to use to embellish your chipboard lettering but also a great way of keeping up with the latest trend of scripted text on papers without having to fork out a lot of money.

Saturday, October 15, 2011

Tutorial - Corrugated Board Frame

I do a lot of online shopping so I have a constant supply of cardboard boxes coming into my home. At first I used to just throw them all away until I realised the true value of corrugated board and what a gorgeous backing it made to just about any kind of paper crafting project. Now I hold onto those boxes and cut them up into manageable size pieces to be used on projects as I need. Today I’d like to share a fun way of making your very own photo frame using some corrugated board. This was a tutorial featured in the August issue of Scrapbook News and Review Magazine

Supplies
Corrugated board
Cardstock
Molding paste
Extra thick gel medium
Glass beads
Mist
Flowers
Step One: Depending on what size frame you want you need to cut two pieces of corrugated board the same size. I used an existing frame I had as a template so I cut two 6x8 pieces.
Step Two: Now cut an opening for your photograph in one of the pieces only. I cut a 3.25x5 opening for my photograph.
Step Three: Remove the top layer of paper from the corrugated board. I suggest that you don’t remove all of the paper. Leave some random pieces in place because this adds character to your project once you add the colour.
Step Four: Add some molding paste to two of the corners across from each other. Use your fingers to create texture and patterns in the molding paste. Then add some extra heavy gel medium to the side panels. Embed your glass beads into the gel medium while still wet. Set this aside to dry. Depending on the amount of molding paste you added you may need to leave it to dry overnight.
Step Five: While your pastes are drying you can work on the back panel of your frame. Use an existing frame as a guideline to cut out the frame stand. You need to do your measurements carefully so that your frame will have the right balance. If you cut your stand too low or high your frame may not be able to stand up on it’s own.
Step Six: Add some liquid adhesive to your panel. It is very important that you not add any adhesive to the “stand” part. You may want to push the stand out before adding the adhesive to ensure that you don’t accidentally get any on it.
Step Seven: Cut a piece of cardstock the same size as your frame and stick it to your back panel.
Step Eight: Lift the stand out of your panel and check that it will allow your frame to stand on its own. Here’s a side view of the frame.
Step Nine: Once the molding paste and glass bead embedded gel medium has completely dried, set it on your craft mat and mist with the colours of your choice. I used some Lindy’s Stamp Gang Moon Shadow mist. I’m love these two toned mists. I used Buccaneer Bay Blue and Tawny Turquoise.
Step Ten: Add some flowers to your frame over the molding paste. I used some white flowers which I also misted with the same Moon Shadow mists. I suggest you stick your flowers down with a hot glue gun if you have one.
Step 11: Stick your photograph onto the cardstock surface of your back panel. Again, measure carefully to ensure that your photograph is centred with the opening of your front panel.
Step 12: Now stick your front panel onto the back panel.
Step 13: Stand your frame up pull the stand out. You may need to play around and make adjustments until it’s able to stand completely stable.

These would make a great personalised gift for a friend or family member. Another option would be to not add the front panel to a stand but use it to frame a photograph on a layout instead. Either way, these are great fun to make and a creative method of recycling your postage packages.

Thursday, July 21, 2011

Bath time

This is a pic taken of my oldest son when he was just a sweet little baby. It's been hiding in a box for years so I was so excited to finally get an opportunity to scrap one of his baby pics. I wanted to try something completely new for this LO. Ever since I started playing around with mixed media gels and pastes I've wanted to cover an etire bg with it. You know, just to see what would happen...LOL!
I started covering the centre of my cardstsock where I planned to place my photograph with some masking tape which I could remove once the pastes were done. I then covered the rest of the surface area of the cs with some molding paste. I used a palett knife to smooth the paste out. I also stamped into the paste with my script stamp.
In some areas I added some Golden extra coarse pumice gel which dries to a very rough texture......absolutely YUMMY!!! In some aread I added some more texture to the molding paste by tapping my finger over the paste creating peaks. These are just gorgeous when you add colour to the dried paste at the end.

I also added some glass beads to some of the areas. All I dis was add the beads while the molding paste was still wet. Because these are slow drying products, you'll have pleanty of time to do this.

I altered this gorgeous Dusty Attic corner flourish with some silver acrylic ink and then added some rhinestones to finish it off.
Last but not least I made a flower cluster in the corner and broke up a Prima vine which I then added to the flower cluster.

For those of you who have never played with gels and pastes, I have one things to say......You're missing out BIG TIME!!! They are so much fun and add incredible texture to your projects. You can add just small amount as I have done to past layouts or you can go the whole hog and cover everything like I did here. Either way, you'll lov ethe results!!

Friday, June 17, 2011

Mixed Media - May projects

Ever since I joined SNR I've been drawn to mixed media more and more. I'm just loving getting my hands dirty in all the fun goops. It's also fun being able to work on smaller pieces to experiment with differnt techniques.
I used some molding paste for the background of this arch which I then painted with some Creative Inspirations paint. I also used some polymer clay to make the vine and mini leaves. I misted the piece of trim with some homemade mist.

I made this set of inchies using some Ranger sticky back canvas which I coloured with several combinations of  distress ink. I stamped the background using my heartfelt creation scrapt stamp and my vintage clock Inkadinkado stamp. I used some Kaiser Craft fabric brads for the center pieces.
I first painted the bg of this ATC with some gold acrylic ink. I stamped onto the painted bg with my script stamp. I then used my Prima mask and some Golden molding paste to add texture to my bg. Once the paste had dried I painted it with some Creative Inspirations paint. I embellished the ATC with some feathers, pearls and psinted Prima blooms to add a vintage flair.

Sunday, June 5, 2011

Tutorial - Creating a Background using Gel Medium as a glue

 For those of you interested in dabbling with some mixed mediums, SNR are running a series under the Mixed Media section introducing gels and pastes and what can be done with each. You'll find eye candy inspiration as well as some easy to follow technique tutorials. Our first task was to make a selection form various gel mediums and create a background using the gel medium as a glue. This is what I came up with.

Heavy gel medium is exactly what its name says, a gel with a very thick consistency which, amongst many other uses, is perfect for gluing larger embellishments to your projects. For my example I selected various size, shapes and colour beads to create a really striking background.

This is what you'll need

Supplies
Heavy gel medium
Beads in several colours and shapes
ATC size board or cardstock
Marker

Step One: Using a marker draw a design on your ATC card to use as a guideline.

Step Two: Add some heavy gel medium to a small section of your ATC. It is advisable to work in small sections at one time to minimize the mess and to make it easier to place your beads according to your design.

Step Three: Begin placing your beads in the allocated areas of your design as shown above.

Three easy steps to creating a gorgeous textured background. You can use this technique on other projects like tags, inchies and cards. It would also look fabulous as part of a background for a scrapbooking layout.

Saturday, June 4, 2011

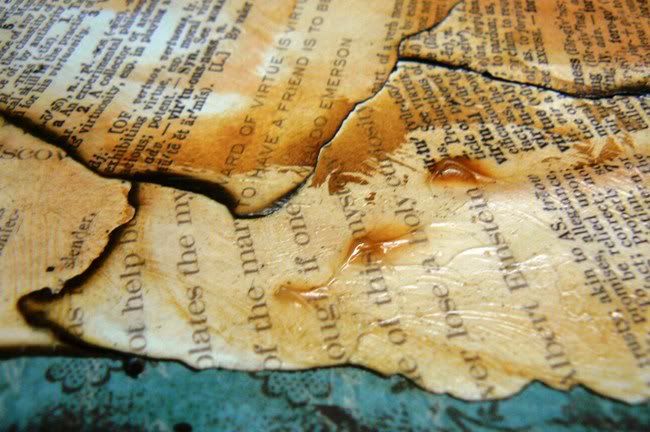
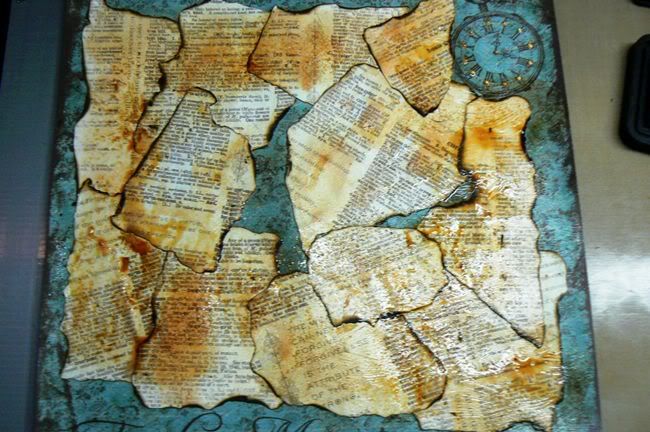
Tutorial - Aged Background using Gel Medium

Coming back to my background series from Aprils issue of SNR, I wanted to offer something to those who enjoy creating vintage themed LO's. For this one you need to be a little more adventurous and break out the gel mediums, inks and paints.

Vintage is one of my favourite styles and probably one of the more difficult styles to master. There are so many factors to consider, the most important being creating the perfect illusion of an aged era. There are several aging techniques availble but I'd like to share one with a little twist that will be sure to deliver the perfect aged background to act as a base to your vintage styled project.


Supplies
A piece of patterned paper or cardstock to use as a base
A piece of text patterned paper
Regular gel medium
Ranger distress ink (Tea Dye and Vintage Photo)
Blending tool
Gold paint
Mister
Tea lite candle

Step One: Tear your text patterned paper into several medium sized pieces. If you don't have any text patterned paper then use pages from an old book or dictionary.

Step Two: Using your tea lite candle, burn the edges of each of the pieces of paper. Keep a damp cloth close by when doing this for safety reasons. Paper can burn extremely fast so if your flames look like they're out of control just douse the flames with your damp cloth.

Step Three: Apply a layer of gel medium paste to the back of each piece of paper and paste them down over-lapping each other as shown above.

Step Four: Keep pasting until you've used all your pieces. If there may be gaps then try and position them where you think you may be able to cover them with your picture or some other embellishment as part of your design.

Step Five: Take your Tea Dye distress ink and run it over your paper in random directions. Don't add too much ink at this point. You want to add just enough to create the illusion of an aged surface.

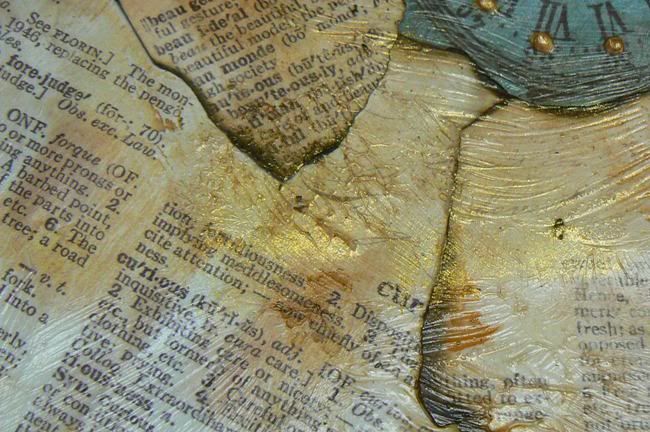
Step Six: Apply another layer of regular gel medium over your paper. When adding this layer do so in a way that you have a combination of thin even layers and denser uneven peaks. Try adding thicker layers in the crevices between the over- lapping papers. Set it aside to dry.

Step Seven: Once your gel medium has completely dried, run your vintage photo distress ink over all the ridges and paper edges.

Step Eight: Mist the entire surface using a mini mister with water. This will spread the ink unevenly to contribute to the aged appearance.

Step Nine: Using a make-up sponge, add some gold metallic paint in random strokes to the surface.

Now you have a fabulous aged background perfect for a vintage styled layout. You could also down size this to create a background for a tag or ATC using the same technique. If you use dictionary paper then try crumpling the paper first to add extra texture.