Homemade flowers are a passion of mine. I'm forever looking out for new ideas and every now and then I'm lucky enough to come across a real gem. One of those rare finds is the brilliant Lisa Gregory's paper Hibiscus flower. I'd like to share my version of this stunner with you.
Supplies:
Cardstock
Glimmer mist
Ink
Paint Brush handle
Tattered Floral Die
Mini sun punch
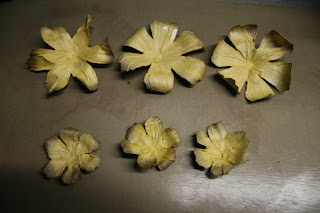
Step One: Gather all your supplies together. Cut 3 of the large flowers and 3 of the medium flowers using your Sizzix Tattered Florals die. Cut small slits between each petal of the medium flowers.
Step Two: Mist all the flowers. I used a combination of Tattered Angels Candle Light and Chocolat Creme glimmers mist
Step Three: Ink the edges of each peatl while the petals are still damp. I used walnut stain distress ink.
Step Four: Place a paintbrush handle in the center of each flower and scrunch the petals up and around the handle as shown above. Use a thinner paint brush handle for the medium sized flowers. Leave these one side to dry.
Step Five: Once the scrunched up petals have completely dried, unfold them carefully. Use the handle of the paint brush once again to now curl the flower petals. Twist the petals of one large flower in opposite directions. Curl the petals of the second flower backwards and then curl the petals of the third flower slightly in. You can curl the petals of all three medium flowers backwards.
Step Six: Layer the three large flowers with the twisted petals at the bottom then the outward curled petals next and the inner curled petals on top.
Step Seven: Layer the three medium flowers on top of each other. Fluff up the petals.
Step Eight: Place the medium flowers in the center of the larger flowers as shown above.
Step Nine: Cut out three sun shapes using a punch. Mist these with some Chocolate Creme glimmer mist.
Step Ten: Layer the three sun shapes on top of each other and srunch them inwards.
Step Eleven: Place the scrunched sun shapes into the center of the flower.
These make a perfect embellishment for any layout or card. You can also play around with the petals for some variation or use multiple colour mists. The starburst punch also make a great center instead of the sun shapes. This is what Lisa used in her version.


Goodness Gracious girl!! This one is a stunner!! I love the colors you used, and every time I see someone do this flower, they all look so different, but oh so beautiful!! Yours is really gorgeous!! Thanks for the shout out Wendy!! I really appreciate your kindness!!
ReplyDeleteBig Hugs,
Lisa
I love to come see your tuts, you do fabulous work. Gonna have to give this one a try for sure,.
ReplyDeleteI can't wait to try these! They're SO gorgeous! TFS!
ReplyDeleteStunning flower. LOVE the colouring of it!
ReplyDeleteWOW just amazing!!! Stumbled over your blog, and wow! So inspirational! Thanks for sharing xx
ReplyDeleteBeautiful - Such a realistic looking flower! Thanks for the very clear tutorial!
ReplyDeleteThese flowers are wonderful. I love sizzix and I am always looking for different ways to use my dies. Thanks for the inspiration.
ReplyDeleteThis is gorgeous....thanks for sharing this with us..
ReplyDeleteYour Blog is fantastic. Thank you so much for sharing.
ReplyDeletebeautiful.
ReplyDeleteSo beautiful, thank you!
ReplyDelete