Because I love making my own backgrounds, I often browse the web looking for new and interesting background techniques. It was on one of these searches just over a year ago that I came across a great tutorial on the Shimmerz website using muslim cloth, tissue paper and some mists. Since then I have used the technique several times and have made a few subtle changes to suit my personal style. I'd like to share my version of this great technique with you.
Supplies
Muslim cloth
Tissue paper
Mists in several colours
Several stamps
Permanent ink like StazOn
Distress ink
Blending tool
Sponge brush
Metallic paint (optional)
Gel Medium or Modge Podge
Step One: Gather your supplies together. Cut a piece of muslim cloth slightly bigger than 12x12". The extra 0.5" is needed because once you're done and your fabric paper has dried, you need to cut the edges down to straighten and neaten it out.
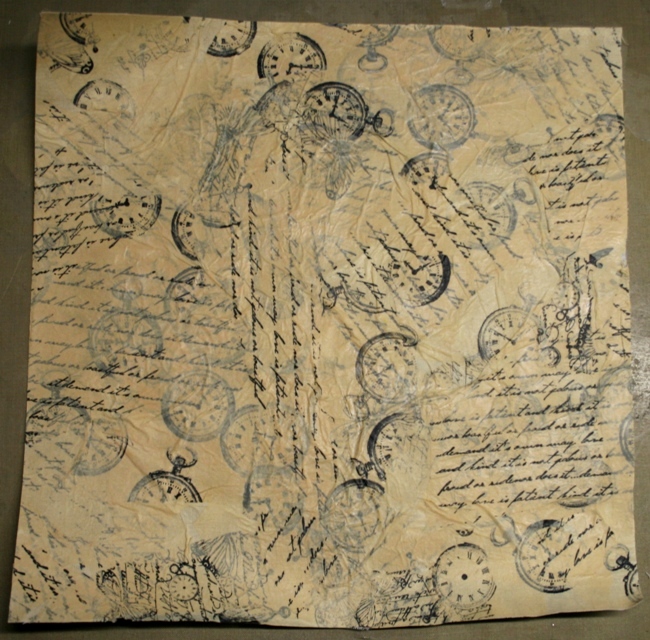
Step Two: Tear your pieces of tissue paper into several medium size pieces. Using several different stamps, stamp images on your tissue paper. I prefer to fill one piece of tissue paper with a single image or background stamp. Because I'm aiming for a vintage style finished paper I used clock and script stamps. Also leave some sheets blank. It is very important to remember to used a permanent ink like StazOn to avoid the image bleading once you start adding the modge podge or gel medium.
Step Three: Scrunch each piece of tissue paper ino a small ball. This will create creases which will add texture to your fabric paper when you start to layer the papers.
Step Four: Now tear the sheets into smaller pieces and form piles with like stamped images together.
Step Five: Water down some modge podge or gel medium. Using a sponge brush, add the mixture to your fabric starting at the top left corner. Layer a piece of tissue paper over the glue mixture as you go. Use randomly placed pieces of various stamped images as well as blank pieces of tissue paper over-lapping each other. Paint another another layer of glue over the paper.
Step Six: continue adding the randomly placed tissue paper until you have done approximately three layers. This will provide a firm base for your project once it has dried. Leave this to dry overnight.
Step Seven: Once your paper has dried completely, cut the edges to straighten and neaten it out.
Step Eight: Now is when the creative fun begins. Using as many or as few shades of mists, spray random patterns onto your paper. For mine I used various shades of browns and some black gold tattered angels glimmer mist.
Step Nine: Using your blending tool and some distress ink, ink the raised edges of the paper to add definition to all the creases. You may also want to ink the edges of the paper for a nice finished look.
Step Ten: As a last finishing touch I selected to add some Liquitex metallic gold acrylic ink using an old toothbrush. This completed my vintage look fabric paper.
You can use your paper as a background for a layout or cut it down into smaller pieces to use on a card or tag. You can also scale it down to an ATC size, this would make a fabulous background for any project of your choosing. You can use a combination of lighter pastels and bright colour mist for something more whimsical. Another option is to use a floral die-cut or punch to make a homemade flower. Whatever your choice, you're guaranteed to love the end result.


so very cool - wow!
ReplyDeleteVery cool!! Love the look.
ReplyDeleteVery interesting. Thanks for that!
ReplyDeleteThank you for sharing this technique, I will definitely have to try it!
ReplyDeleteThank you for sharing... the fabric is called muslin
ReplyDeleteLove your blog, you have so many fantastic "do it yourself" techniques here!!!
ReplyDeleteI can't wait to try this. You explained everything so well. Thank you.
ReplyDeleteBrilliant, I just bought some muslin and was using tissue yesterday, perfect idea for me, thank you
ReplyDeleteI love your technique. Thanks
ReplyDeleteIt's muslin, not Muslim.
ReplyDeleteMUSLIN
ReplyDeleteMOD PODGE