Have you ever wondered what you can do with some of the tiny chipboard pieces leftover from sets sitting in your stash gathering dust? If so, why not gather them all together, add a little embossing powder or paint, and use them to create something new and unique. You can transform dozens of mismatched spare pieces into one lovely embellishment or even create a border to use on a layout.
Supplies
•Chipboard pieces
•Paints
•Embossing folder
•Embossing machine
•Heavy gel medium
•Glass beads
•Cardstock
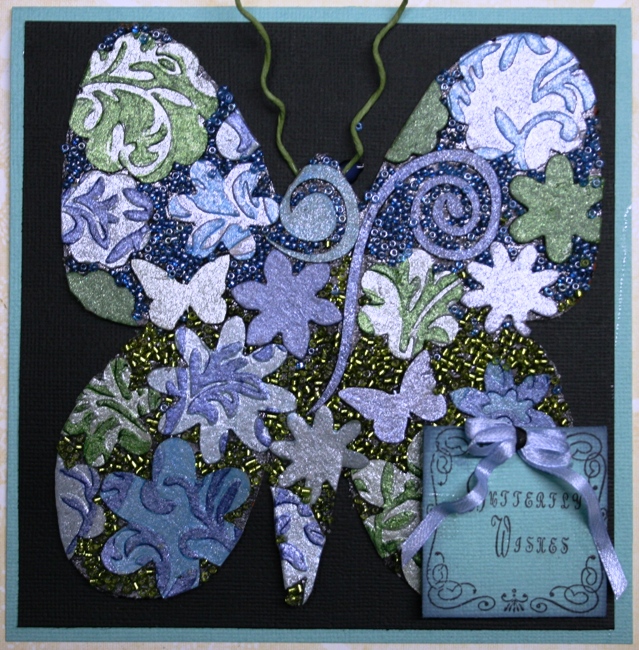
Step One: Draw the shape you want onto a scrap piece of cardstock. I used a scrap piece of bright orange cardstock purposely to demonstrate how any color will do. Try and keep your shape simple because it will be difficult to create fine details once you start adding the chipboard pieces.
Step Two: Cut your shape out of your cardstock.
Step Three: Paint the cardstock shape with a dark base color. I used Ranger’s black paint dabber.
Step Four: Emboss and paint all your chipboard pieces. Try using several complementary colors together. Add a thick layer of heavy gel medium to the surface of the cardstock and embed the chipboard pieces into the gel medium.
Step Five: Continue embedding the chipboard pieces into the gel medium. You may want to place some of the pieces over the edges for this will create a more natural looking design.
Step Six: Add glass beads to the areas between the chipboard pieces, and use your finger to press the glass beads tightly into the gel medium until the entire surface is completely covered.
Step Seven: Set your project aside to dry completely. Once it has dried, turn it over onto the back side.
Step Eight: Using a sharp pair of scissors, cut away all the excess pieces hanging over the edges.
Step Nine: Turn it right side up again and neaten up all the edges. You may want to take a close look at the entire surface area and fill any gaps where the glass beads may have fallen off. Then use your shape to embellish a layout or card.
This same technique can be adapted to create a border for a layout.
Cut your layout border from a piece of cardstock. Follow the same steps from above covering the entire surface area with your chipboard pieces. Add glass beads to fill all the gaps and trim excess pieces away from the edges.
Here's the layout I used my border on.


you are SO inspirational!
ReplyDeleteLove that border!
ReplyDeleteLove that border!
ReplyDelete