Tuesday, January 24, 2012

Jan Swirlyhues Challenge entry - Confident

This is my entry for the January Swirlyhues Challenge. You can find all the details for the challenge on their blog. Lisa Valentine is this months host and I must just say that I absolutely love the colour palett she selected and the sketch provided is absolutely gorgeous!! Remember that this challenge is open to everyone and not just Swirlydoos kit club members.
Firstly, I turned the sketch design around for my layout but then kept most of the other elements of the sketch in my design.
One of the requirements for the challenge is to use one or more of the Swirlydoos tutorials provided by their incredibly talented DT. One of the tutorials I selected was Lisa Gregory's Corner Punch Deco Circle . This is one of my all time favourite scrapbook tricks I've learnt. I even did my own version of the tutorial while on staff at SNR magazine. The paper fan frame was inspired by the brilliant Natasha Naranjo Aguirre (thanks Natasha!)
Another Swirly's tutorial I used was Camilla's Chipboard with Crackle Accents but I used Ranger Rock Candy Crackle paint instead of the crackle accents. I first painted my DA chippie with some Denim Creative Inspirations paint and then randomly dabbed on some snow cap paint. Once that dried I painted over it with the crackle paint which I inked over with some Vintage Photo disress ink once it had completely dried to highlight the cracks.
The third swirly's tutorial I used was Lidia's Deep Distressing. This is an amazing technique which I absolutely love. My version is not quite as stunning as Lidia's but I really enjoyed trying the technique.

This incredible corner bouquet is from my very dear friend Katie's Etsy shop. She makes the most amazing embellishments and I'm a huge fan of her bouquets.

Another one of my favourite products is Lindy's Stamp Gang embossing powders which I used to alter this TPC mirror chipboard sticker. I removed the "mirror" part and replaced it with a piece of cs which i inked and added some Kaiser tiny alpha letters.

Thanks so much for taking the time to read my post, I hope you enjoyed it and learnt a little somthing along the way.

Wednesday, January 18, 2012

~ Play Time ~

This is a pic of my youngest DS Matt just before we cut all his baby curls off. I used a combination of three of my favourite product brands on this layout, Dusty Attic, Bo Bunny and Lindy's Stamp Gang..........a match made in heaven.

Bo Bunny's Timepiece collection is one of my all time favourites. I adore all the neutral tones and that die is simply gorgeous. I used a lot of my white blooms from I am Roses, one of my favourite online stores which I  then misted with some Lindy's Stamp Gang moon shadow and starburst sprays. I also misted the piece of lace.


I altered the scroll DA chipboard pieces with some of the amazing LSG embossing powders. These EP's are simply incredible. Not only do they deliver a gorgeous metallic finish but they are 2 toned which makes them all the more delicious and they're perfect for fine detailed chipboard pieces. I also added a few pearls for an extra vintage finish.

I altered the title DA pieces by misting them with some Tawny Turquoise Moon Shadow Mist from LSG. How gorgeous is that shimmer!!!!! Again I added some pearls to finish off.

As always I added a lot of paper distressing to my layout and was rather delighted with the finished product. Thanks so much for taking the time to look.

Thursday, January 12, 2012

Tutorial - Embossed Beeswax and Perfect Pearls Bloom


Here's something a little different for those of you looking to experiment with some Mixed Media but don't want to stray too far away from traditional scrapbook techniques.

I'm a huge fan of Donna Salazar's paper flowers and I especially love the Rose Creations Spellbinders set. For this tutorial I decided to put Donna's Crafty Chronicals to the test and add a mixed media spin on what is already a well known paper flower using some beeswax and Perfect Pearls.

Supplies required
Donna Salazar Rose Creations Spellbinders set
Donna Salazar Crafty Chronicals
Distress ink
Beeswax
Perfect Pearls
Dusting brush
Craft iron
Embossing Folder
Embossing machine (I used my Cuttlebug)
Small plastic sandwhich bag
Brad to use as a flower centre


Step One: Using the Rose Creation Spellbinders set, cut two of the large petals and then one of each of the remaining size petals giving you seven petals in total from your Crafty Chronicals. I selected pieces that had text only but there are so many interesting background possibilities to choose from including maps. You can also cut two of the large leaves (not shown on picture). Ink the edges of each of the petals with some vintage photo distress ink.


Step Two: Working on your craft mat sprinkle some of the beeswax pellets over your paper petals. Using a craft iron gently iron over the beeswax until it begins to melt. Spread the heated wax over the entire surface area of all the petals making sure that no puddles form.

Step Three: Once the beeswax has cooled, which will only take a few seconds, carefully peel the petals from your craft mat. Cut away any of the excess bits of wax from each of your petals.


Step Four: After several failed attempts at trying to find a method to sucessfully emboss beeswax, I discovered that a plastic sandwhich bag is your best bet. The plastic is thicker than saran wrap so it peels away from the beeswax a lot easier. Do not use wax paper, a lesson I leant the hard way. Place your petals and leaves into the bag so that they lie without overlapping each other. Place the bag into an embossing folder and tuck away the excess plastic so that it does not get tangled in your embossing machine.


Step Five: Run it through your embossing machine. Notice how the plastic sticks to the beeswax. It's for this reason that you don't want to use wax paper. It is literally impossible to peel away the wax paper. Saran wrap is very thin and can be tricky to remove whereas the sandwhich bag plastic peeled away very easily without affecting the embossed images.

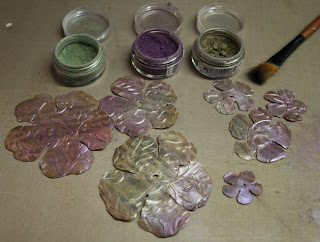
Step Six: Add some colour to your flower and leaves by dusting on some Perfect Pearls. The stickyness of the beeswax makes a perfect base for the mica powders. You do not need to spitz water onto the perfect pearls to seal it as the moisture from the wax will hold the colour perfectly. I used a combination of green patina, antique gold and forever violet for my flower and the green patina only for the leaves.

Step Seven: Working from your largest petals to the smallest petals alternate between curling the petals backwards and inwards as shown above. You can use the handle of your dusting brush to do this.

Step Eight: Now stack your flower starting with the largest flower with the petals curled backwards until the smallest flower. The Rose Creation dies already have a hole in the centre of each flower so it's easy to add a pearl brad as a flower centre. Tuck the leaves under the flower and stick down to complete your flower.

Beeswax is really a fun product to work with and colouring it with Perfect Pearls delivers a gorgeous result. The Crafty Chronicals paper held up to this technique perfectly so if you don't already have some then it's woth the investment. Alternatively use a scripted piece of pp made from a thick cardstock.

Tuesday, January 10, 2012

Tutorial ~ Vintage Pretties

This is a variation of the Anglaise Pretties tutorial I did for the May issue of SNR. I absolutely love making my own flowers and often struggle deciding between fabrics and lace or paper for my creations so I decided to mix the two together and create something completely new using the Donna Salazar Antiquities collection which just oozes vintage charm.

Supplies
Patterned papers
Donna Salazar Rose Creation die cut
Ink
Anglaise lace
Needle and thread
Feathers
Hot glue gun


Step One: Using the Donna Salazar Rose Creation dies, cut two sets of the size #1 to #5 petals. You do not need the largest set of petals (#6). For more interest cut each set in contrasting colours so that you have layers of contrast as you construct your paper flower. Ink the petal edges with some Vintage Photo distress ink for a more finished look.


Step Two: Starting with your smallest petals (#1) and using the handle of a thin paint brush, wrap the petals around the tip of the paint brush handle as shown. Scrunch the petals closely around the handle. Add a little liquid adhesive to the second small petal in your contrasting paper and layer that over the first flower. Now do the same to for your #2 petals and the first of you #3 petals. You will now have five layers all scrunched up around each other to form your rose bud flower centre.


Step Three: For the next layer, curl the petals of your second #3 petals inwards to form a cup like shape. Add a small amount of liquid adhesive to the centre of the petals and glue your rose bud centre down.


Step Four: For this layer curl one of the #4 petals backwards and the other inwards as shown. Add some adhesive to the centre of the petals and glue your rose bud centre to the flower with the petals curled inwards first and then layer that on top of the flower with the petals curled backwards alternating the petals.


Step Five: For your final layers of your paper flower curl the corners of both sets of #5 petals backwards and pinch them between your fingers to form a “v” shape. Layer your rose onto these two layers alternating the petals.


Step Six: Cut a piece of anglaise lace approximately 12” in length. Using a needle and thread stitch the entire length of your lace along one edge using a running stitch.


Step Seven: Now gather your lace to form a circle and tie the thread in a knot to hold it in place. For some extra vintage flare stick one or two feathers to the centre of your flower using a hot glue gun.

Step Eight: Stick your paper flower rose to the centre of your lace base using a hot glue gun and you’re done.

You now have a perfectly co-ordinated flower ready to add to your vintage style paper crafting project. You can change it up a little by adding some diamond dust to the paper flower for some extra sparkle or possibly use more textured lace to create your base. Whatever your personal style is, the combination of paper and lace will certainly add some visual interest to your project.