Showing posts with label Dusty Attic. Show all posts

Tuesday, April 24, 2012

Rendezvous of Randomness First Challenge up and OPEN!!

This picture of my youngest DS was just perfect for the launch of yet another STTG monthly challenge called Rendezvous of Randomness being hosted by my fellow STTG DT member, Adrienne Ford. Adrienne is an incredibly talented artist and is well renown for her brilliant background creations. Her colour blending skills are true perfection and I personally look forward to seeing every new masterpiece she creates.  
The Rendezvous of Randomness challenge is just that.......Random! Adrienne will select a different challenge every month which will be posted on the 21st and run until the 20th of the following month. Like all the other STTG Challenges there will be  a $20 STTG STORE VOUCHER up for grabs in a random draw.
Her first challenge is this beautiful "Spring is in the air" colour challenge with a few extra twists.
  • Use the five color palette and matching photo as inspiration to create your project. Try to get the colors as close as you can to the palette. However, please don't stress- the point is to just have fun!

And because we all like a good twist here are some added things you can do to stand out in the gallery!
  • Twist #1- Because Spring IS in the air, add a nature element to your layout- this could be a bird, butterfly, or whatever "nature" is to you. Please specify in your description what element you chose. 
  • Twist #2- Add a wet medium to your background. This could be paint, gesso, inks, dyes, mists, etc. 
For my DT challenge contribution LO "Cool Beach Boy" I used both twists. I used my Dusty Attic Chicken Wire piece with some gesso to stamp on the white cs which I then misted over with some homemade mist to create my bg. I also added the large yellow butterfly as the second twist.
All the chippies on this were altered with some gesso which I layered on quite thick and then tapped with a finger to create extra texture and dimension.

Items used from the STTG store
Dusty Attic Chicken Wire panel
Dusty Attic Picket Fence
Zva Creative roses

I hope you'll come and join in the fun!!


Saturday, April 14, 2012

STTG - First 3D Sketch Challenge

One of my fellow DT members at STTG, Doris Widder,  is hosting a monthly sketch challenge called 3D Sketches starting today. The challenge runs from the 14th to the 14th of every month.
It's a sketch challenge with a twist....3 twists to be specific. Doris will provide a sketch as well as a choice of 3 additional twists to use on your project. You are only required to use 1 of the three twists to qualify for the challenge.

This is the sketch provided for April
The three twists we were given to choose from are chipboard, embossing and distressing.
I decided to use all three twists because they all seem to go together so easily. I heat embossed all the Dusty Attic chipboard pieces and used water distressing along with gesso for some extra punch.

So.....if you enjoy sketch challenges then please drop in and join the 3D Sketches Group. Not only will you have the oportunity to become part of a great group of ladies but you'll also stand a chance to win a $20 store gift voucher. There are so many wonderful items available in the store, many of which i used on my LO above, namely;

Glitz Pretty in Pink collection
Petaloo Large Wild Roses
Petaloo mini Canterbury collection
Zva Creative roses
Crinkled ribbon
Silk Ribbon
Viva Pearl Pen
DA Sweat Pea Frame set
DA Scroll Border #1
DA words - Enjoy the Moments 

Thursday, March 22, 2012

STTG #2 - Level 3 DT Project


This is my DT layout for the STTG #2 challenge which close 31st March 2012. I did this for level 3 using all four colours. I selected lace, pearls and flowers as my embellishments and the Pink Paislee resistable paper has a damask print on.

For the homemade flower I used my own No Sewing Fabric Bloom tutorial. I used some cream crushed satin fabric and made 8 cones for a lovely full bloom. I altered all the flowers and chipboard pieces using some creative inspiration paints mixed with a white pearl acrylic paint. For the chipboard pieces I added a think layer of paint which I then dabbed with the paint brush to create the uneven textured finish.

To give the photo a more distressed looking finish I dabbed some of the ice blue paint around the photo edges.

Items available in the STTG Store

Cream crinckled ribbon
Petaloo Mini Canterbury collection
DA Scroll border #1

You have until March 31st to post your entries for the challenge. Remember that there are 3 different levels so this challenge is open to paper crafters of all skill levels. Hope you'll come join in the fun.
TFL

Tuesday, March 13, 2012

STTG #2 - Level 1 and 2 DT projects


Level 1 - Select 2 of the four colours provided plus 1 embellishment of the four options


STTG # 2 Challenge options
Colours to select from: Ice Blue, Lavender, Gray, Cream
Embellishment options: Flowers, Pearls, Lace, Bling

For my DT project for Level 1 I knew it would be virtually impossible for me to create a LO using only 2 colours and 1 embellishment so I decided to go another route and create a card for a friend's baby's upcoming first birthday. Because it's for a boy I decided to select Ice Blue and Gray as my colours and used flowers as my embellishment.
I misted some of the white crinkle ribbon with Licorice Shimmerz mist and painted the white Zva mini roses I had with some light blue Creative Inspiration Paint which also has a beautiful shimmery finish.

I altered my chipboard pieces by first painting them with a light blue acrylic paint which I then coated liberally with some Ranger Rock Candy crackle paint. Once the crackle paint had dried I went over the pieces with some black soot distress ink to provide more definition to the cracks. I wiped away the excess ink with a paper towel so that only the ink between the cracks remained.

Items used from the STTG STORE
Ranger Distress Cardstock
Zva mini roses
Petaloo Canterbury Collection
Crinkle Ribbon
DA - Cameo Ribbon Slide

Level 2 - Select 3 colours and 2 embellishments
For my level 2 project I again decided not to do a LO but chose to alter a wooden memory block I've had lying in my cupboard for several years already. I added a picture, title letters for my DD's name, a frame jounal piece listing her birth details and then another jounalling piece with some memories of what she was like as a baby.
 I selected to use lavender, gray and cream as my colour combination and chose flowers and pearls as my embellishments.

I was originally going to use one of Erins baby pictures but then decided to use this family shot instead. This picture was taken only hours after Erin was born. It was a very significant moment for me because I had been a single mom for over 4 years before my DH and I met so my DS Jarrod had been used to having me all to himself. I worried throughout the pregnancy about how he would react to having a baby in the house so we wanted him to meet his sister as soon as possible so that they could form a bond. By the look on his face in the pic and the strong bond they have today, 6 years later, I'd say it was a wise decision.

I created the cool textured finish of these DA alphas by simply add a thick layer of metallic lilac acrylic paint to each letter and then dabbing the paint brush into the paint creating peaks.  It looks really beautiful IRL.
This is a snap shot of the other side of the block. I was rather dismayed to realised that I had missed painting over several spots of my red Zva roses. I was working on this project late at night and obviously got too tired to notice the finer details like the roses and some of the sides of the chipboard pieces weren't painted properly. But then again, it's mistakes like those which make projects all the more real to me rather than being purely show pieces.

Items used from the STTG STORE
Distress Cardstock
Zva roses
DA Alphabet set- Dusty Curls

Now that you see how easy level 1 and 2 for the STTG #2 challenge is, I hope you pop in at the new STTG NING  site and jpin in the fun. The challenge is open until the 31 March.
I'll be back to post my level 3 project soon so watch this space!!!

Wednesday, January 18, 2012

~ Play Time ~

This is a pic of my youngest DS Matt just before we cut all his baby curls off. I used a combination of three of my favourite product brands on this layout, Dusty Attic, Bo Bunny and Lindy's Stamp Gang..........a match made in heaven.

Bo Bunny's Timepiece collection is one of my all time favourites. I adore all the neutral tones and that die is simply gorgeous. I used a lot of my white blooms from I am Roses, one of my favourite online stores which I  then misted with some Lindy's Stamp Gang moon shadow and starburst sprays. I also misted the piece of lace.


I altered the scroll DA chipboard pieces with some of the amazing LSG embossing powders. These EP's are simply incredible. Not only do they deliver a gorgeous metallic finish but they are 2 toned which makes them all the more delicious and they're perfect for fine detailed chipboard pieces. I also added a few pearls for an extra vintage finish.

I altered the title DA pieces by misting them with some Tawny Turquoise Moon Shadow Mist from LSG. How gorgeous is that shimmer!!!!! Again I added some pearls to finish off.

As always I added a lot of paper distressing to my layout and was rather delighted with the finished product. Thanks so much for taking the time to look.

Wednesday, June 15, 2011

~Pretty as a Flower~

This layout was done for the May Colour Inspiration call at SNR. Each month we're provided with 3 images and 2 colour paletts to select from. We then need to use our selected colour palett and the image we select as inspiration to create a layout.

This is the image I selected for May
I used my Dusty Attic chipboard piece to represent the gate in my inspiration piece. I would've loved to have had some of those fantastic Dustic Attic gate pieces but I couldn't afford to wait the 3 weeks shipping time to SA so I made the best of what I had on hand. I added some floral pieces above my chipboard to mimic the inspiration piece.
  I used some more Dusty Attic scrolls to represent the wall hangings in the inspiration pieces. I added some mini roses to the top. I painted the scroll with some Creative Inspiration paints and added some pearls to finish it off.

All in all, this was a loose translation of the inspiration piece. the Prima paper I used as my background added just the right amount of busy floral.

TFL

Tuesday, June 14, 2011

~12 Dec~

When we got married on the 12th December six years ago we had our photographer do up a professional album which I absolutely love. I have never wanted to scrap any of my wedding pictures because I already have this fantastic album to look through. But when SNR added a wedding thenme call for the May issue I decided to use one of the spare pics we were given by the photographer.

I used some of the Pink Paislee Parisian Anthology resist paper with some distress inks for this LO. I couldn't find a piece of pp in the right shade of blue that would compliment the gorgeous blue sky in the background of our pic so I decided I would need to make some of my own bg paper.

I used Lisa Gregory's corner punch circle border to make my circle and inked the edges. I cut another smaller circle out of the center and distressed and inked the edges of that too. 
I made some fabric flowers using some electric blue and very light cream taffata. I added some curly roses which I misted with some homemade mist I made using reinker and perfect pearls in a mini mister. The Prima lillies were a perfect touch to finish the LO off with.

Who knows, I may even scrap some more of those spare wedding photos I have lying in a drawer.

Monday, June 13, 2011

~Special Bond~

This is a pic of my youngest two taken when we were on Vacation in the Drakensburg. I used the swirlydoos Moulin Rouge kit for this layout. I also decided to try the sketch that came with the kit. The sketch made it easy to place some of the lovely Prima embellishments that came in the kit. I am totally inlove with the Prima paper collection in this kit too. Krissy is a superstar at putting them together.
This layout was also featured in the May issue of SNR.

When I first saw the large feather that came in the kit I had no idea how I would use it without it looking totally ridiculous. Using the sketch resolved this. By simply placing the feather behind my paper  circle helped it to blend into the layout without over powering it.

I used the Prima flowers to follow the lines of the circle. I broke the vine up into three pieces and positioned them between the Prima blooms.
I also used one of my mini Prima masks on the top right corner with some vintage photo distress ink. For some finishing touches I added some Zva Creative pearl flourishes and Prima pearls which I scattered randomly on the paper circle.

Saturday, May 21, 2011

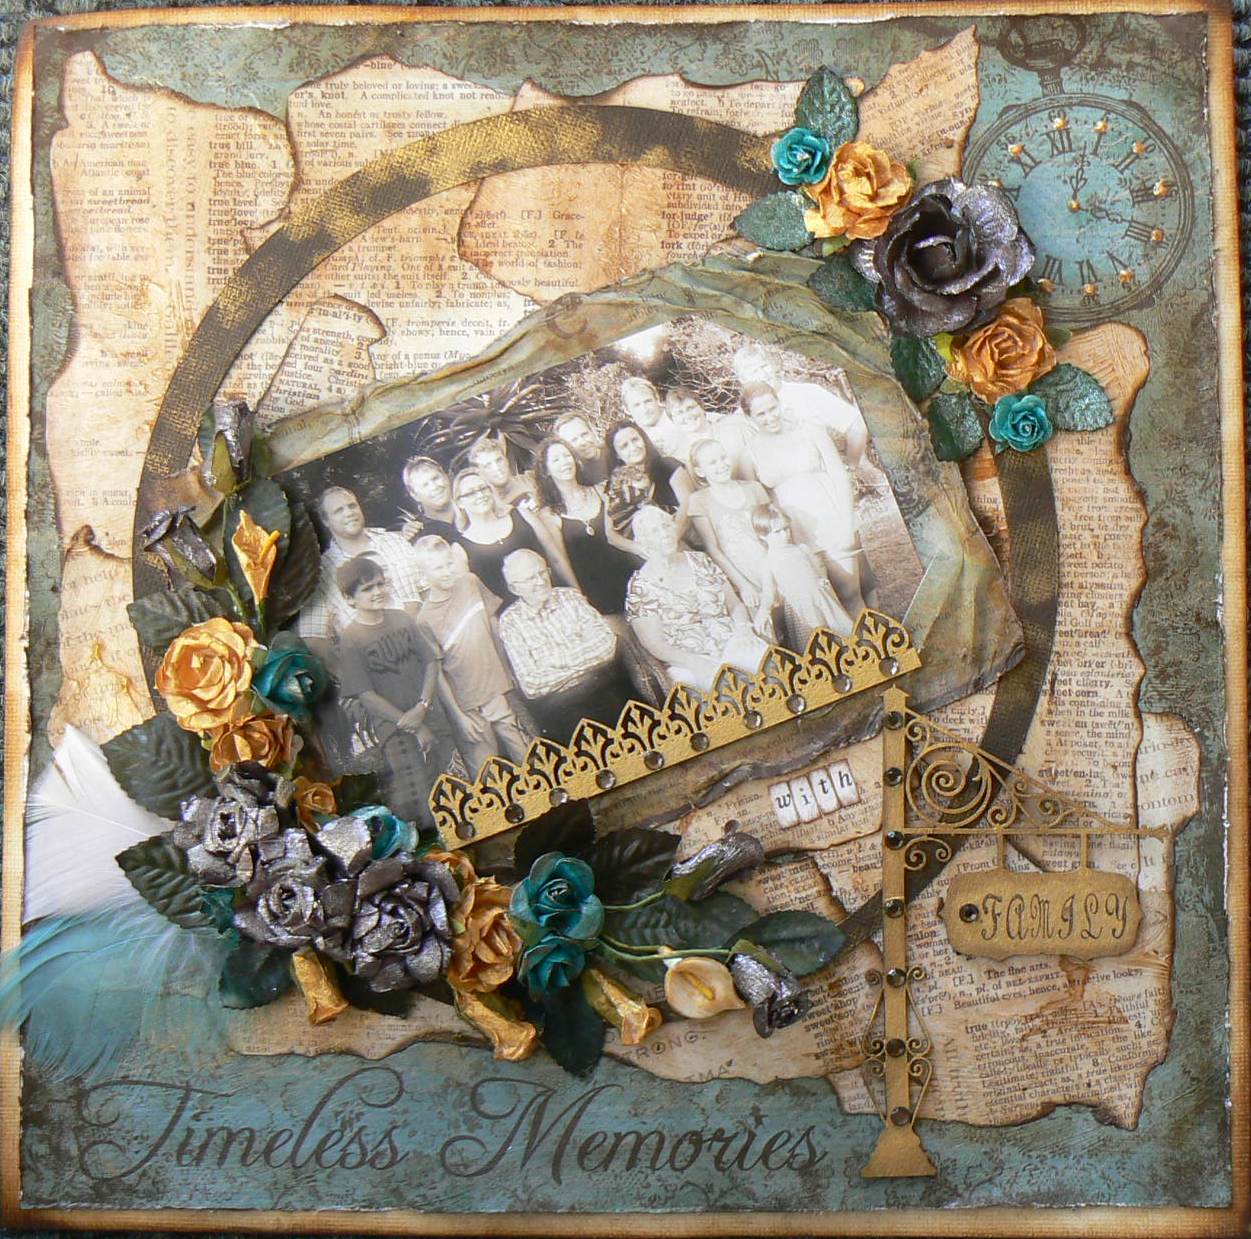
~Timeless Memories~ March Swirlydoos kit

This is the second LO I did using the March swirlydoos kit. It was also published in the April issue of SNR.
I know I mentioned it before but I really do LOVE this particular kit. Vintage is one of my favourite styles and these pp's and the embellies Krissy put together in the kit are all just perfect.

I created an aged look using some gel medium, ink, mist and paint for an upcoming tutorial. I can only post the tutorial later this month for publication reasons but if you love vintage then this is oe you wont want to miss.


This gorgeous corner bouquet is from my dear friend Katie's etsy shop. She has incredible talent and the most beautiful bouquets. The original colour of the bouquet was white and burgandy so I altered it with some creative inspiration paints and liquitex metallic ink paint.

I  created this flower cluster on the other side of the circle to balance the LO. I used some white flowers which I also altered using paint.
I used some gorgeous Dusty Attic pieces which I painted with the same gold ink paint I used for the flowers.

Thank you for stopping by and be sure to stop by again for the detailed tutorial.

Friday, May 20, 2011

Tag - Dress Form

I did this for the April tag call at SNR. The theme was dresses or dress forms so I dedided to combine both elements. I created the background using a combination of raisin, espresso and gold mixative alcohol ink on some triplex board. I then added a few strips of lace which I had coloured with some vintage photo reinker across the tag. I embossed my Dusty Attic dress form with some vintage photo distress embossing powder. The bodice of the dress form was embossed using some platinum UTEE and then some Pink Zing embossing powder. I used some scrap printed fabric to make the skirt and added some lace trim to the waste with some mini roses I got from iamroses.com.
I made the necklace using some tiny gems I got at a local craft store. I finished the tag off by adding some string pearls which I coloured with some alcohol ink and stuck to the very edge of the tag border. The gorgeous vintage ribbon was a gift from my dear friend Andrea (Zuk) which added the perfect finishing touch to my tag.

Saturday, April 16, 2011

~My Love ~Jan Swirlydoos kit

This is another LO I did for the March issue of SNR. This was for the cardboard base call where your background had to be a cardboard. As much as I love working on cardboard, I sometimes find it difficult finishing the edges off properly. Mine always look to tatty. This is when I decided to cut the centre out of a pp that was part of the Jan swirlydoos kit and use it to frame my cardboard base.


The flowers are from iamroses.com. This company stocks the most beautiful paper flowers and very competative prices and only charge $0.50 per item no matter where you are in the world. Shipping is also very quick so  place regular orders. The leaves are stamps from Heartfelt creations which I coloured with some distress inks.
I embossed this gorgeous wrought iron fence piece from Dusty Attic with some walnut stain distress embossing powder. I used some of the blue perfect pearls that came with the kit to accent the tips of the gates. I must just tell you that Rangers new formula for their perfect pearls make much better pearl drops than their original formula. I misted these mini rose buds with some homemade mist I made with spiced marmilade reinker and perfect pearls mixed with water. I then wrapped the rose buds around the wrought iron fence.

This is another Dusty Attic piece which I treated the same way as the wrought iron fence. Dusty Attic are by far my favourite chipboard manufacturer. I'm yet to see a piece I'm not completely inlove with.

I used some Creative brads as a pop of colour against the orange cardstock ring. I absolutely love the vinatge range of brads from Creative Charms.
I'm not sure if these chippies from Scarpbook King are supposed to be angels or cupids so I decided to make mine a cupid.....if I say it's a cupid, then it's a cupid!!! LOL!
I painted the body with some acrylic paint and then outlined him with some stickles.

Thanks so much for taking a moment to look.

Wednesday, April 13, 2011

~Proud Brother

~
This layout was done for the "All things Faux" March call at SNR. I absolutely love this picture of my oldest son holding his baby brother when he was just a few weeks old. He really does look like a very proud brother.

I used the textured flower tutorial featured in the March issue of SNR. I will be posting a copy of the tutorial later this month. I absolutely LOVE these flowers and can't wait to make a whole lot more of them. The leaves are stamps by Heartfelt creations which have been inked with Ranger distress inks.

 
Now this was my favourite part of making this LO. I used my very best scrapping buddie, Lisa Valentines's
Faux Leather Background tutorial. Don't you just love the look of this and it's such a simple technique. Lisa has incredible talent and a knack for making the most gorgeous accents out of nothing!!!

I made my own flourishes using some mint perfect pearls and Espresso Dimensional pearls on some transparency. I have a ton of pearl flourishes in my stash and yet I still favour making my own ones....silly hey!

Last but certainly not least, I used some of my favourite chipboard pieces from Dusty Attic. I first painted them with some metallic paints and then embossed them with some vintage photo distress embossing powder and finished them off by inking them with some walnut stain distress ink.


Friday, March 18, 2011

Tutorial - Adding shimmer to your scrapbooking patterned papers

Here's another quick tip I shared in the February issue of SNR.

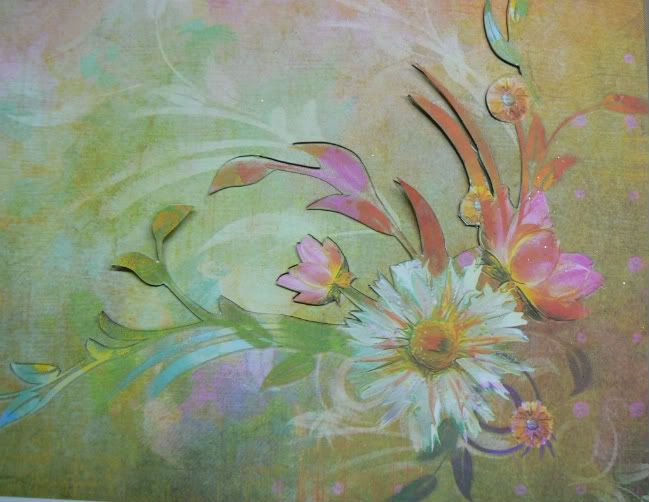
I was in the mood for working on a really girly layout so I picked out my papers and although the Prima papers are absolutely stunning on their own I felt they were lacking a little sparkle, which is what I wanted for this particular layout. With a little experimenting I discovered this really fabulous technique which helped breath life into my layout.
It's very simple and a great way for you to get your hands wet with working with some mixed mediums on your layouts.


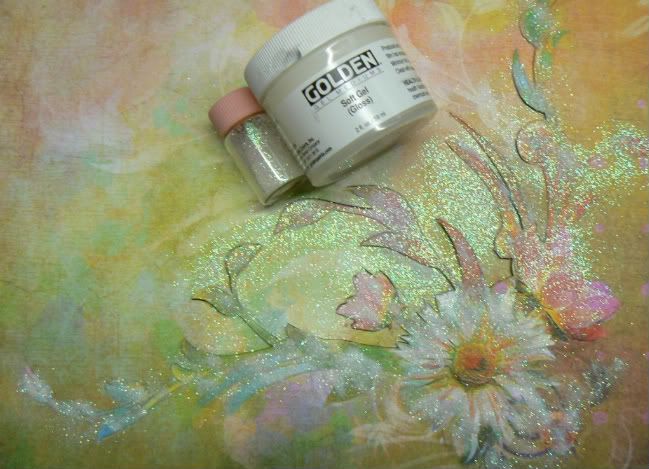
Supplies
Soft Gloss Gel (I used Golden Soft gel)
Fine glitter
Paint brush


Step One: Gather all your supplies together. Select your patterned paper. I had already started my fussy cutting by the time I decided to try the technique. You can however use the technique on solid uncut paper where you want to add some sparkle as part of background.


Step Two: Using your paint brush, add some soft gloss gel to the areas you want to alter. On my layout I added sparkle to the flower image on the bottom right of the paper, the paper I matted my photo with and the cardstock circle I wrapped some ribbon around. As you paint your paper gently tap some glitter over the area. The gloss gel dries quite quickly so I suggest you sprinkle the glitter as you paint. Fine glitter works best for this technique.


Step Three: Dust any excess glitter off onto a spare piece of paper which you can then use to funnel back into it's container.

It's that easy. There are so many options for this simple technique but here are few that spring to mind immediately

  • On a piece of patterned paper as shown above
  • To color a stamped image with
  • To add sparkle to your fussy cutting pieces used as embellishments
  • To alter store bought embellishments
  • To alter chipboard pieces
Other interesting techniques used on this LO:
I used my polymer clay leaves tutorials for the little green leaves and the braided vine tutorials for my vine circle. You can find links to both these tutorials on the right panel under "my tutorials".

    Sunday, February 13, 2011

    ~Little Miss Attitude~

    This was the layout I did for the SNR January Colour Inspiration call. These calls are exclusive to the SNR staffers and can be great fun. We are given 3 inspiration pieces and 2 colour palettes to choose from. Once you've made your selection then you have to use these to create a layout or card.

    This is the inspiration piece and colour palette I selected. I was not only drawn to the design of the inspiration piece but also to the elements in the piece. I knew I could use my ballerina bloom tutorial to represent the fluffy flower in the bottom left picture. I also had a beautiful Dusty Attic chandelier piece I could use to represent the light fitting in the inspiration piece. I combined the lace and the ruffles of the cake icing to make the ruffled lace at the bottom of the photo.
    I decided to use the design of the inspiration piece as my bg design. I used white cardstock which I then inked with various combinations of distress inks. I used aged mahogany, scattered straw, worn lipstick, walnut stain. I placed the photo in the centre of the design to put my own spin on the inspiration piece design as I did not want to duplicate it exactly.

    These calls can be great fun and I hope you check back next month for the February piece which is my all time favourite of the ones I've done so far.
    If you're a SNR subscriber then check it out in the mag on the 17th when the Feb issue is published.