Thursday, March 22, 2012

STTG #2 - Level 3 DT Project


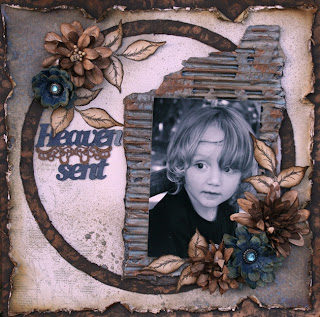
This is my DT layout for the STTG #2 challenge which close 31st March 2012. I did this for level 3 using all four colours. I selected lace, pearls and flowers as my embellishments and the Pink Paislee resistable paper has a damask print on.

For the homemade flower I used my own No Sewing Fabric Bloom tutorial. I used some cream crushed satin fabric and made 8 cones for a lovely full bloom. I altered all the flowers and chipboard pieces using some creative inspiration paints mixed with a white pearl acrylic paint. For the chipboard pieces I added a think layer of paint which I then dabbed with the paint brush to create the uneven textured finish.

To give the photo a more distressed looking finish I dabbed some of the ice blue paint around the photo edges.

Items available in the STTG Store

Cream crinckled ribbon
Petaloo Mini Canterbury collection
DA Scroll border #1

You have until March 31st to post your entries for the challenge. Remember that there are 3 different levels so this challenge is open to paper crafters of all skill levels. Hope you'll come join in the fun.
TFL

Tuesday, March 13, 2012

STTG #2 - Level 1 and 2 DT projects


Level 1 - Select 2 of the four colours provided plus 1 embellishment of the four options


STTG # 2 Challenge options
Colours to select from: Ice Blue, Lavender, Gray, Cream
Embellishment options: Flowers, Pearls, Lace, Bling

For my DT project for Level 1 I knew it would be virtually impossible for me to create a LO using only 2 colours and 1 embellishment so I decided to go another route and create a card for a friend's baby's upcoming first birthday. Because it's for a boy I decided to select Ice Blue and Gray as my colours and used flowers as my embellishment.
I misted some of the white crinkle ribbon with Licorice Shimmerz mist and painted the white Zva mini roses I had with some light blue Creative Inspiration Paint which also has a beautiful shimmery finish.

I altered my chipboard pieces by first painting them with a light blue acrylic paint which I then coated liberally with some Ranger Rock Candy crackle paint. Once the crackle paint had dried I went over the pieces with some black soot distress ink to provide more definition to the cracks. I wiped away the excess ink with a paper towel so that only the ink between the cracks remained.

Items used from the STTG STORE
Ranger Distress Cardstock
Zva mini roses
Petaloo Canterbury Collection
Crinkle Ribbon
DA - Cameo Ribbon Slide

Level 2 - Select 3 colours and 2 embellishments
For my level 2 project I again decided not to do a LO but chose to alter a wooden memory block I've had lying in my cupboard for several years already. I added a picture, title letters for my DD's name, a frame jounal piece listing her birth details and then another jounalling piece with some memories of what she was like as a baby.
 I selected to use lavender, gray and cream as my colour combination and chose flowers and pearls as my embellishments.

I was originally going to use one of Erins baby pictures but then decided to use this family shot instead. This picture was taken only hours after Erin was born. It was a very significant moment for me because I had been a single mom for over 4 years before my DH and I met so my DS Jarrod had been used to having me all to himself. I worried throughout the pregnancy about how he would react to having a baby in the house so we wanted him to meet his sister as soon as possible so that they could form a bond. By the look on his face in the pic and the strong bond they have today, 6 years later, I'd say it was a wise decision.

I created the cool textured finish of these DA alphas by simply add a thick layer of metallic lilac acrylic paint to each letter and then dabbing the paint brush into the paint creating peaks.  It looks really beautiful IRL.
This is a snap shot of the other side of the block. I was rather dismayed to realised that I had missed painting over several spots of my red Zva roses. I was working on this project late at night and obviously got too tired to notice the finer details like the roses and some of the sides of the chipboard pieces weren't painted properly. But then again, it's mistakes like those which make projects all the more real to me rather than being purely show pieces.

Items used from the STTG STORE
Distress Cardstock
Zva roses
DA Alphabet set- Dusty Curls

Now that you see how easy level 1 and 2 for the STTG #2 challenge is, I hope you pop in at the new STTG NING  site and jpin in the fun. The challenge is open until the 31 March.
I'll be back to post my level 3 project soon so watch this space!!!

Wednesday, March 7, 2012

DUSTY ATTIC - GET IT WHILE STOCK LASTS!!!


Tracy from STTG has finally received her long overdue orders of Dusty Attic. The STORE is bursting with stock but I must warn you that STOCK IS MOVING FAST!!!!!

SO GET SOME DELICIOUS DUSTY ATTIC CHIPBOARD DESIGNS WHILE THEY LAST.

Here are some of my favourite which are IN STOCK and ready to be shipped (for now, that is.....better hurry!!)


Monday, March 5, 2012

Tutorial - Grunging up Darjeeling


 The Petaloo Darjeeling collection is made up of some amazing warm colours and unique styles definitely makes them one of my all-time favourite collections. The flower style and colours already lend themselves to a soft grungy look and with just a little extra help you can transform them into something really grungy, perfect for a masculine project. The technique I'm sharing with you will also help put those box loads of eyelets I'm sure every paper crafter has hidden in the bottom of their stash somewhere to good use.

Supplies
Darjeeling Flower
Eyelets
Eyelet tool
Metal flower centre
Step One: Select your flower. Ideally you want a flower that has wide petals so that you have a good surface to work on and can add several eyelets to a single petal.

Step Two: Using your eyelet tool punch your holes for your eyelets. You want to punch the holes far enough away from the petal edges that the petals don't tear. Make sure that your holes are spaced wide enough apart so that the eyelets won't overlap when you add them.
Step Three: Now add the eyelets to the petals and close them off at the back. Work carefully when doing this so that you don't tear your petals. You can now ink the petals with some walnut stain distress ink to add a little more definition if you like. I also chose to remove the clay flower centre and replace it with a metal and pearl one.

This is the Layout I used my newly altered grungy flower on.
I chose to use eyelets in the same shade as my flower but these look just as good if you add some brass or copper eyelets. You could also spice it up a bit by colouring your eyelets with some alcohol ink first. Whatever your taste, once you try this I'm confident that eyelets will go right back onto your shopping list.

Here is another layout I did using the Darjeeling collection on to create a Grungy Feminine layout. I did not use the eyelet technique on these but instead coated them with some gel medium which gives the flowers a leathery appearance once it dries. The gel medium also stiffens the petals which makes it easier to manipulate them to create a fuller looking flower.
On this layout, using the Darjeeling collection once again, I added the gel medium to the blue flowers and removed the flower centre it came with and replaced them with some vintage brads. I also used some of the Petaloo Color me crazy flowers on this which I inked brown with some distress ink.

These truly are some of my favourite flowers and I just love that you can add them to regular shabby chic styled layout or you can be a little adventurous and grunge them up a little and then use them against a corrugated board background as I have done with my three layouts for a completely different look.  
TFL

Friday, March 2, 2012

STTG #2 Challenge is up and OPEN!!

Colors...
Lavender ~ Ice Blue ~ Cream ~ Gray

Embellishments...
Bling ~ Flowers ~ Pearls ~ Lace

Shapes...
Damask ~ Diamond

Techniques...
One of Wendy's NEW stamp techniques
You can find her tutorials here!!

A handmade flower
You can find tutorials here!!


How to play!!! :)

Level #1
Pick at least 2 colors and 1 embellishment
Prize is a $10 STTG Gift Card... Winner will be randomly drawn
ahhhh c'mon... just try... it'll be FUN!!! :)

Level #2
Pick at least 3 colors and 2 embellishments
Prize is a $15 STTG Gift Card... Winner will be chosen by the DT
Little bit more challenging with some added competition!! :)

Level #3
Use all 4 colors and at least... 3 embellishments, 1 Shape & 1 Technique
Prize is a $25 STTG Gift Card... Winner will be chosen by the DT
Push your creativity with this one and you've got even MORE competition!!! :)


When uploading your image to the gallery...
Please include STTG #2 in your title... (including other sites)
Please include which level you're entering in your description


Have FUN and try something NEW!!

You have until midnight March 31st PST
Winner will be announced on April 1st


A note about the photo from STTG owner Tracy Gutierrez


My girls and I have Tea Devotionals with this tea set. It's a great time to relax, focus on God, talk about things and really encourage & lift each other up!! I encourage you to have some quiet time with God each & every day too. Our relationship with God grows stronger when we spend time with HIM!! :)

My daughter Katie took this photo... thanx My Little Miss!!

I created the flowers out of organza fabric and followed Wendy Greenaway's awesome tutoral!! You can find the link here...


Thank you Wendy!! :) (It's a pleasure Tracy, glad you liked them and yours look fantastic!!)

STTG #2 Challenge link - Come on in and register and join the FUN!!

Tuesday, February 28, 2012

**STTG #1 Challenge** Thankful 4 ur Girly Girl Smile

This is my first DT project for STTG. As I posted earlier, Tracy is hosting a monthly challenge with a $25 gift card up for grabs. Her first challenge was to create a LO, card or altered project using the word "Thankful" or "Thank You". Growing up I was a little bit of a tomboy so I never got to appreciate all the fun girly girl things. When I had my daighter I was a little worried that she may be the same because she had an older brother she idolised. But much to my relief she turned out to be the best of both worlds. She loves fashion and dressing up and being a girly girl but is just as capable to playing rough and tough with her 2 brothers.

For my flower clusters I really wanted the misted look but didn't want to necessarily mist my bg papers so I decided to experiment and built my clusters on some scrap chipboard, misted them with several different colour mists and then added the misted clusters to the LO. I really like how it turned out and I'll be putting a tutorial together shortly for the technique.

I finished my chipboard pieces off by dabbing some textured molding paste onto the entire surface area to create a rough textured finish. Once the paste had completely dried I painted over it with some Creative Inspiration Paints. I tucked the Dusty Attic dress form (available from the STTG store) behind the flower cluster and added some more mini roses to the waste.
To finish the LO off I added some lacing down the right using two colours of silk ribbon. This is a simple but eye catching lacing technique and a great way to fill empty space on a LO.

All the Dusty Attic pieces and Glitz papers in this LO are available at the STTG store so pop over there, you'll be pleasantly surprised.

Friday, February 24, 2012

Stamping on Layouts

As a scrapbooker one of the challenges I faced was trying to figure out how I could incorporate stamping into my layouts. To most of you that may come naturally but for some reason this seemed to pose a serious challenge for me. It was only once I started stepping out of my comfort zone of only using patterned papers and started creating my own background papers that I finally found a use for my small stash of stamps I had slowly accumulated. Before that I assumed stamps were exclusive to the card makers of the world.....LOL!

I'd like to share ways I've used stamps on layouts in three of my projects to maybe inspire any other scrapbookers out there who may have the same reservations I had about stamping and scrapbooking. For the above LO I used a flourish stamp from Rubbernecker stamps on some pale pink cardstock. I first stamped and embossed the image with clear embossing powder. I then inked over the entire piece of cardstock with a combination of worn lipstick and aged mahogany distress ink. The embossed stamped images acted as a resist to the distress ink thus creating a pattern on the cardstock. I also stamped the same image on some transparency with StazOn ink which I then cut out and used as flourishes for my flower clusters.
For my second project I first stamped some random Rubbernecker stamp images onto some coloured tissue paper which I then tore up into smaller pieces and layered onto some cardstock using gel medium. Once that dried I added some black soot distress ink to the borders. This technique adds great texture to a LO and depending of the stamps you use can be used for various styles and themes.
For my final project I used some tiny Technique Tuesday floral stems to stamp a border around the edge of my carstock. I applied two colours of ink to the stamp to create the multi-coloured border. The butterflies are also a Technique Tuesday stamp which I stamped on some transparency with StazOn ink. I then added stickles to the reverse side of the image and once the stickles dried, I cut the images out and shaped the wings before sticking them on the LO.

These are just three simple ways of using stamps on a LO. I'm always looking for new techniques so please feel free to leave me a link if you know of any other tricks.

Friday, February 17, 2012

LO - True Love (Rework of an old LO)

Hi there, I thought I'd share a small project I worked on this week. While visiting my in-laws I happened to walk past a framed LO I had given them 2 years ago around the time of their 50th wedding anniversary. It looked so "not me" if I think of the way my style has changed these last 2 years so I decided I needed to update the LO for them.
The picture is one of my favourites from their wedding album and in my original LO I had it scanned and printed in sepia. This time I decided to use a black and white picture instead which I knew would work well with the Bo Bunny Enchanted collection I planned on using.
I wanted to stay true to the original LO by keeping some of the design elements like the circle and floral cluster so I used a sketch by Beggahuna as inspiration for the updated LO. I love using a lot of distressing and all sorts of paints and pastes but decided to simply things and not go all out for this LO because my in-laws are elderly and my current grungy style may not appeal to their tastes. I did however distress the paper edges with my Zutter Diistrezz-It-All (I just LOVE that machine!!!)

My mother-in-law's favourite colour is blue so I used pops of a dusty shade of  blue as a contrast against all the B&W.It's difficult to see in the picture but I added some glitter to the black circle which complimented the glittery finish of the Bo Bunny pp's. I also painted my white Gardenia with some Creative Inspiration paints which gave it a beautiful shimmer. The lace trim below the photo is actually silver and not grey as it appears in the photo. The pretty B&W butterflies are from Angelics's etsy shop.

Here's a quick peek at the original LO


Now I only hope that my in-laws will like the updated LO too.

TFL!!!

Hugs

Wendy

Thursday, February 16, 2012

STTG #1 Challenge is up - $25 Gift Card up for grabs!!!!

Now there isn't a scrapper alive I know that wouldn't appreciate a $25 gift card to have fun shopping with especially when the store in question is filled to the brim with delicious Dusty Attic peices.

That's right, Tracy from STTG is hosting her first challenge over at the brand new STTG Ning Site and the winner get a $25 gift card to spend in the STTG store. Beside the Dusty Attic, Tracy has a great selection of Glitz papers, silk ribbon, Viva Pearl Pens, Zva roses and so much more.

Pop on over and sign up. Feel free to add as many as your LO's to the gallery to share with your fellow scrappers, we all enjoy a little inspiration.....

Here's the details for the STTG #1 challenge provided on the front page of the new ning site.

 For our very first challenge... it's going to be super simple...Create a "Thankful" project!! :)
  • It can be a simple "Thank You" card.
  • A layout describing what you're thankful for.
  • Even an altered art piece with photos of your family.

Rules...
  • You must include "Thankful" or "Thank You" on your project.
  • When uploading your image to the gallery... please include #1 in your title. When uploading on other sites... please include STTG #1.
  • The Design Team is encouraged to play along but are not eligible to win.
  • You have 2 weeks to complete your project.
  • The winner will be chosen by a random draw on February 29th and announced on March 1st.
  • The winner will receive a $25 gift card to our STTG store.


What are YOU thankful for???

Have FUN creating!!! :)

..

Monday, February 6, 2012

CSI #4 - Sweet Slumber

This is my entry for the CSI #4 Challenge. I'm delighted that I finally managed to get a LO done in time before the dreaded deadline, even if it was at 11:30pm my time the day of the deadline...LOL!. It's a great new ning site and I must say that Debbie and her team have put together some interesting challenges.

Above is a summary of what this weeks challenge was. You have to use at least two items from the "Evidence" list. I used a frame and my wet mediums were mists and gesso. I also added several metal pieces as my reflective surface item. "Testimony" is the guideline provided for your page journaling. This alone is a challenge for me because I usually don't add journaling to my LO's. My journaling is a childhood prayer I used to say every night at bedtime.

I am a huge fan of Finnabair's and have been dying to try her misting technique. Unfortunately I have not had the privledge of ever attending one of her classes but I have studied her work and tried to pick up bits and pieces along the way. I have no idea how she puts her LO's together but based on what I THINK she does, I did my own version of her misting technique.
To start I first masked some brick wall detail onto my Prima Mistable canvas base using gesso which I knew would act as a resist when I added the mist later.

I then glued down my photo...what a crazy feeling to glue your photo down first before altering your embellies. I then added some strips of lace here and there which I used as a base for my floral clusters

The great part about this technique is you don't have to colour co-ordinate your flowers because you're going to mist them anyway. It's a perfect opportunity to use up the last of some floral collections gathering dust in your stash. I also added some metal pieces to my clusters. To finish off I placed various sized pearls around each floral cluster.
I wrote my journaling on some cs and framed it with a small metal frame. I then also added some lace and made a mini floral cluster alongside the frame. A helpful tip is to use a hot glue gun when creating clusters so that your items stick instantly and don't move around when adding to it.

Once everything was stuck down I covered my picture and journaling frame with some plastic wrap to protect them from the mist. I then used mists the colours of the colour pallett provided for the challenge and had an ink party for one!!!!! This was so much fun and even though my LO isn't even close to the brilliance of finnabair, I'm delighted with the results for my first attempt and will defintely use this technique again.