Vintage is one of my favourite styles and probably one of the more difficult styles to master. There are so many factors to consider, the most important being creating the perfect illusion of an aged era. There are several aging techniques availble but I'd like to share one with a little twist that will be sure to deliver the perfect aged background to act as a base to your vintage styled project.

Supplies
A piece of patterned paper or cardstock to use as a base
A piece of text patterned paper
Regular gel medium
Ranger distress ink (Tea Dye and Vintage Photo)
Blending tool
Gold paint
Mister
Tea lite candle

Step One: Tear your text patterned paper into several medium sized pieces. If you don't have any text patterned paper then use pages from an old book or dictionary.

Step Two: Using your tea lite candle, burn the edges of each of the pieces of paper. Keep a damp cloth close by when doing this for safety reasons. Paper can burn extremely fast so if your flames look like they're out of control just douse the flames with your damp cloth.

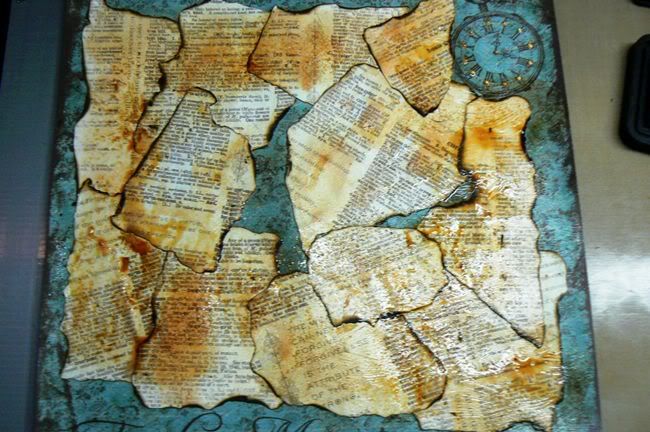
Step Three: Apply a layer of gel medium paste to the back of each piece of paper and paste them down over-lapping each other as shown above.

Step Four: Keep pasting until you've used all your pieces. If there may be gaps then try and position them where you think you may be able to cover them with your picture or some other embellishment as part of your design.

Step Five: Take your Tea Dye distress ink and run it over your paper in random directions. Don't add too much ink at this point. You want to add just enough to create the illusion of an aged surface.

Step Six: Apply another layer of regular gel medium over your paper. When adding this layer do so in a way that you have a combination of thin even layers and denser uneven peaks. Try adding thicker layers in the crevices between the over- lapping papers. Set it aside to dry.
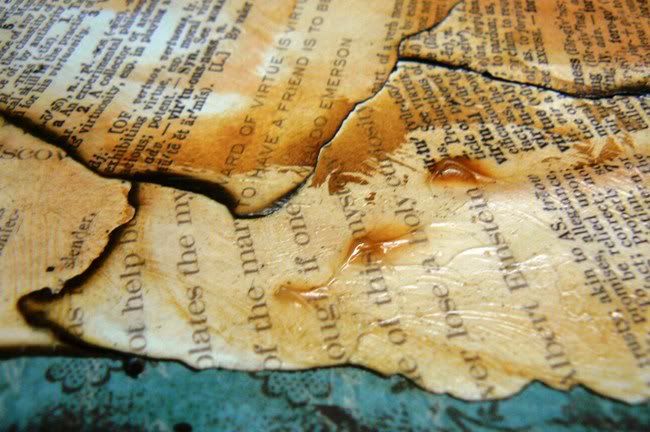
Step Seven: Once your gel medium has completely dried, run your vintage photo distress ink over all the ridges and paper edges.
Step Eight: Mist the entire surface using a mini mister with water. This will spread the ink unevenly to contribute to the aged appearance.
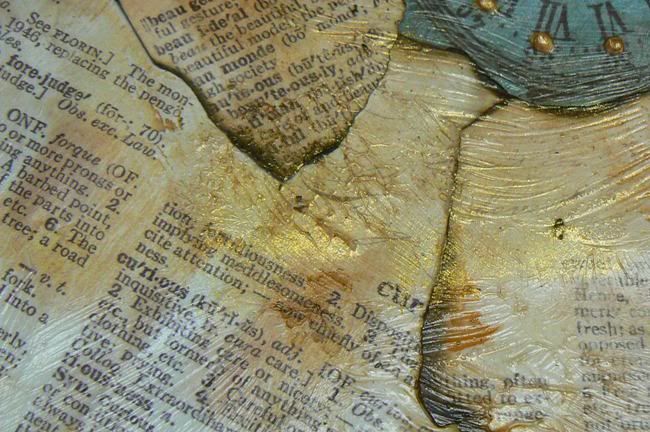
Step Nine: Using a make-up sponge, add some gold metallic paint in random strokes to the surface.
Now you have a fabulous aged background perfect for a vintage styled layout. You could also down size this to create a background for a tag or ATC using the same technique. If you use dictionary paper then try crumpling the paper first to add extra texture.
Wendy your page is just SO gorgeous!! I love this technique! Now I have to get that gel medium. I wonder if decoupage glue will work?
ReplyDeleteGreat tutorial and love the results!!!
ReplyDeleteThis is one fabby technique...great lo to!!
ReplyDeletewonderful
ReplyDelete